Minimal cross-platform graphics
I grew up with BASIC and Turbo Pascal. My first programs were very simple graphical games. I still miss the era of BGI and BASIC’s painting commands. Those graphics were neither beautiful nor fast, but they were simple. Simple enough for a kid with only elemental geometry knowledge to build something exciting.
Even today, whenever I want to prototype or visualise something, to experiment with generative art or to write a toy graphical app – I feel nostalgic for the old days.
Sure, there is SDL2 and Qt and JavaScript Canvas and Löve and many others. But how hard could it be to build our own cross-platform graphical library from scratch?
Our goal here is to have a framebuffer for a single window that would run and look the same on Linux, Windows and macOS. Good old C would the language of choice to keep the retro-computing atmosphere of the story.
TLDR: the end result is available as a single-header library on Github: https://github.com/zserge/fenster.
Linux
From my past experience with webview and lorca, Linux is the easiest platform to develop for. Or maybe I’m just biased. Of all the graphical options that Linux provides we’ll choose X11 as the foundation to our window, since it’s the lowest common denominator, so to say.
It all starts with opening the display connection. X server is an actual network server, so all the APIs are special packets sent over the X server connection. Once the connection is established – we should choose the screen and create a window on that screen. Fortunately, X11 comes with very simple and convenient APIs for all of it. Then we enter the event loop where we poll for incoming events and can handle them. Once we are about to exit the app – we close the display connection.
// cc main.c -lX11 && ./a.out
#include <X11/Xlib.h>
int main() {
  Display *dpy = XOpenDisplay(NULL);
  int scr = DefaultScreen(dpy);
  Window wnd = XCreateSimpleWindow(dpy, RootWindow(dpy, scr), 0, 0, 320, 240, 0, BlackPixel(dpy, scr), WhitePixel(dpy, scr));
  XStoreName(dpy, wnd, "Hello, X11");
  XSelectInput(dpy, wnd, ExposureMask | KeyPressMask);
  XMapWindow(dpy, wnd);
  for (;;) {
    XEvent e;
    XNextEvent(dpy, &e);
    // handle events here
  }
  return XCloseDisplay(dpy);
}
In only 15 lines of code we got a working window with the given size 320x240 and a title!
macOS
While X11 apps can run on macOS using XQuartz, it’s still better to support native Cocoa apps. We won’t be using Swift or XCode and will try to only rely on bare bones technologies to remain portable. Let’s start with Objective-C, something like this might work:
// cc -x objective-c main.m -framework Cocoa && ./a.out
#import <Cocoa/Cocoa.h>
int main() {
  [NSApplication sharedApplication];
  [NSApp setActivationPolicy:NSApplicationActivationPolicyRegular];
  NSWindow *wnd =
      [[NSWindow alloc] initWithContentRect:NSMakeRect(0, 0, 320, 240)
                                  styleMask:NSTitledWindowMask
                                    backing:NSBackingStoreBuffered
                                      defer:NO];
  [wnd setTitle:@"Hello, Cocoa"];
  [wnd makeKeyAndOrderFront:nil];
  [NSApp activateIgnoringOtherApps:YES];
  for (;;) {
    NSEvent *event = [NSApp nextEventMatchingMask:NSAnyEventMask
                                        untilDate:[NSDate distantPast]
                                           inMode:NSDefaultRunLoopMode
                                          dequeue:YES];
    // handle events here
    [NSApp sendEvent:event];
  }
  [wnd close];
  return 0;
}
Slighly more verbose but still very compact and follows the same logic: start an app, open a window, run event loop, close the window.
But it’s Objective-C and I promised you just C…
macOS + C
Fortunately, macOS comes with Objective-C runtime library that enables calling Objective-C constructs from C using something like a reflection layer:
// For example this:
[NSApplication sharedApplication];
// Becomes:
objc_msgSend(objc_getClass("NSApplication"), sel_getUid("sharedApplication"));
But now it’s barely readable. Imagine rewriting initWithContextRect like this. Also, if you experiment more with it you’ll discover that objc_msgSend should be type-casted to a correct signature before each call to avoid crashes.
But what if we come up with some clever preprocessor macros to achieve a terser syntax?
#include <objc/NSObjCRuntime.h>
#include <objc/objc-runtime.h>

#define msg(r, o, s) ((r(*)(id, SEL))objc_msgSend)(o, sel_getUid(s))
#define msg1(r, o, s, A, a)                                                    \
  ((r(*)(id, SEL, A))objc_msgSend)(o, sel_getUid(s), a)
#define msg2(r, o, s, A, a, B, b)                                              \
  ((r(*)(id, SEL, A, B))objc_msgSend)(o, sel_getUid(s), a, b)
#define msg3(r, o, s, A, a, B, b, C, c)                                        \
  ((r(*)(id, SEL, A, B, C))objc_msgSend)(o, sel_getUid(s), a, b, c)
#define msg4(r, o, s, A, a, B, b, C, c, D, d)                                  \
  ((r(*)(id, SEL, A, B, C, D))objc_msgSend)(o, sel_getUid(s), a, b, c, d)

#define cls(x) ((id)objc_getClass(x))
Here msg is a message (think: method call) with no arguments. The return type should be specified, the receiver of the message and the message name itself. Similarly msg1, msg2, msg3 and msg4 are helpers for messages with one and more parameters. For each parameter a type should be provided as well as its value. Finally, cls is just a helper for objc_getClass.
Using these macros our minimal Cocoa window can be rewritten in standard C as follows:
// cc main.c -framework Cocoa
...
extern id const NSDefaultRunLoopMode;
extern id const NSApp;
int main() {
  msg(id, cls("NSApplication"), "sharedApplication");
  msg1(void, NSApp, "setActivationPolicy:", NSInteger, 0);
  id wnd =
      msg4(id, msg(id, cls("NSWindow"), "alloc"),
           "initWithContentRect:styleMask:backing:defer:", CGRect,
           CGRectMake(0, 0, 320, 240), NSUInteger, 3, NSUInteger, 2, BOOL, NO);
  id title = msg1(id, cls("NSString"), "stringWithUTF8String:", const char *,
                  "Hello, Cocoa");
  msg1(void, wnd, "setTitle:", id, title);
  msg1(void, wnd, "makeKeyAndOrderFront:", id, nil);
  msg(void, wnd, "center");
  msg1(void, NSApp, "activateIgnoringOtherApps:", BOOL, YES);
  for (;;) {
    id ev = msg4(id, NSApp,
                 "nextEventMatchingMask:untilDate:inMode:dequeue:", NSUInteger,
                 NSUIntegerMax, id, NULL, id, NSDefaultRunLoopMode, BOOL, YES);
    msg1(void, NSApp, "sendEvent:", id, ev);
  }
  msg(void, wnd, "close");
  return 0;
}
Now it’s a perfectly valid C code that does exactly the same as the Objective-C code above. Moreover, using this technique we can create new classes dynamically, attach methods to them, create delegates and do much more. But for now our goal is achieved – we’ve made an empty macOS window with a title.
windows
WinAPI was traditionally designed to be used from C/C++, and Windows is a graphical desktop OS, so making a window on Windows should be pretty straightforward (although tautological).
#include <windows.h>
LRESULT CALLBACK wndproc(HWND hwnd, UINT msg, WPARAM wParam, LPARAM lParam) {
  switch (msg) {
    // handle events
  case WM_CLOSE:
    DestroyWindow(hwnd);
    break;
  case WM_DESTROY:
    PostQuitMessage(0);
    break;
  default:
    return DefWindowProc(hwnd, msg, wParam, lParam);
  }
  return 0;
}

int WINAPI WinMain(HINSTANCE instance, HINSTANCE prevInstance, LPSTR pCmdLine,
                   int nCmdShow) {
  MSG msg;
  HINSTANCE hInstance = GetModuleHandle(NULL);
  WNDCLASSEX wc = {0};
  wc.cbSize = sizeof(WNDCLASSEX);
  wc.style = CS_VREDRAW | CS_HREDRAW;
  wc.lpfnWndProc = wndproc;
  wc.hInstance = hInstance;
  wc.lpszClassName = "demo";
  RegisterClassEx(&wc);
  HWND hwnd = CreateWindowEx(WS_EX_CLIENTEDGE, "demo", "Hello, WInAPI",
                             WS_OVERLAPPEDWINDOW, CW_USEDEFAULT, CW_USEDEFAULT,
                             320, 240, NULL, NULL, hInstance, NULL);
  ShowWindow(hwnd, SW_NORMAL);
  UpdateWindow(hwnd);
  while (GetMessage(&msg, NULL, 0, 0)) {
    if (msg.message == WM_QUIT)
      return 0;
    TranslateMessage(&msg);
    DispatchMessage(&msg);
  }
}
WinAPI version requires a separate callback to handle all window events, unlike the previous two platforms, where events could be handled inside the loop body. Also it requires to register a window class before creating a window. But other than that it’s rather trivial: open a window, run event loop, handle events, exit when the window is closed.
Now that we’re done with window initialisation and the main loop for all three common desktop platforms – we can move on to actually drawing something inside those windows.
Graphics
We won’t do any fancy graphics, we won’t bother with GPUs and OpenGL. We’ll aim for a very simple framebuffer view. Typically, a framebuffer is a section of RAM that contains a bitmap and changing that bitmap affects the video display.
In our case we will create an array of 32-bit integers, where every integer controls a single pixel of the window. Changing the value of an integer would change the color of a single pixel. More advanced algorithms could be used to draw spires, lines, rectangles, circles, arc etc. But we’ll come back to it later. Now let’s draw some pixels.
X11
In our X11 window a framebuffer can be implemented using a graphical context (GC) and an image:
Display *dpy = ...
Window *wnd = ...
uint32_t buf[320*240];
GC gc = XCreateGC(dpy, wnd, 0, 0);
XImage *img = XCreateImage(dpy, DefaultVisual(dpy, 0), 24, ZPixmap, 0, (char *)buf, 320, 240, 32, 0);
// later in a loop
XPutImage(dpy, wnd, gc, img, 0, 0, 0, 0, 320, 240);
XFlush(dpy);
Image is backed by an array, every time we change the array – we should call XPutImage and flush the connection to redraw the window. Writing random integers to the array would create colourful white noise. Writing 0xff0000 would paint it red. Now let’s try reproduce it on macOS.
CoreGraphics
We can keep using ObjC runtime to create a custom NSView class and override its drawRect method. Then in a loop we would need to invalidate the view, it should trigger drawRect and we’re done.
static void draw_rect(id v, SEL s, CGRect r) {
  CGContextRef context =
      msg(CGContextRef, msg(id, cls("NSGraphicsContext"), "currentContext"), "graphicsPort");
  CGColorSpaceRef space = CGColorSpaceCreateDeviceRGB();
  CGDataProviderRef provider = CGDataProviderCreateWithData(NULL, buf, width * height * 4, NULL);
  CGImageRef img =
      CGImageCreate(width, height, 8, 32, width * 4, space,
                    kCGImageAlphaNoneSkipFirst | kCGBitmapByteOrder32Little,
                    provider, NULL, false, kCGRenderingIntentDefault);
  CGColorSpaceRelease(space);
  CGDataProviderRelease(provider);
  CGContextDrawImage(context, CGRectMake(0, 0, width, height), img);
  CGImageRelease(img);
}

// Create view class
Class c = objc_allocateClassPair((Class)cls("NSView"), "FensterView", 0);
class_addMethod(c, sel_getUid("drawRect:"), (IMP)draw_rect, "i@:@@");
objc_registerClassPair(c);
// Create view instance and add it to the window
id v = msg(id, msg(id, (id)c, "alloc"), "init");
msg1(void, wnd, "setContentView:", id, v);
// Later in a loop:
msg1(void, v, "setNeedsDisplay:", BOOL, YES);
If needed we can override more methods and create a custom delegate class for the window to handle the close button properly and do other nice things.
HBITMAP
On Windows we don’t need a separate child view, but we have to handle WM_PAINT message instead. Inside we would do things exactly like we did on macOS and Linux – we create an HBITMAP, configure information about its pixel format, and send framebuffer data to the canvas. Something like this:
PAINTSTRUCT ps;
HDC hdc = BeginPaint(hwnd, &ps);
HDC memdc = CreateCompatibleDC(hdc);
HBITMAP hbmp = CreateCompatibleBitmap(hdc, width, height);
HBITMAP oldbmp = SelectObject(memdc, hbmp);
BITMAPINFO bi = {{sizeof(bi), width, -height, 1, 32, BI_BITFIELDS}};
bi.bmiColors[0].rgbRed = bi.bmiColors[1].rgbGreen = bi.bmiColors[2].rgbBlue = 0xff;
SetDIBitsToDevice(memdc, 0, 0, width, height, 0, 0, 0, height, buf, (BITMAPINFO *)&bi, DIB_RGB_COLORS);
BitBlt(hdc, 0, 0, width, height, memdc, 0, 0, SRCCOPY);
SelectObject(memdc, oldbmp);
DeleteObject(hbmp);
DeleteDC(memdc);
EndPaint(hwnd, &ps);
Here in the BITMAPINFO initialiser -height is not a typo. According to MSDN negative height values for uncompressed bitmaps mean that the bitmap is filled up from the top to bottom (unlike BMP format that goes from the bottom to the top).
User input
Now that we got an app window and a framebuffer working – we can attempt to handle some user input, such as keyboard or mouse. The good news is that we already have an event loop/callback, so all we need is to extend that with a few more “case” statements within a switch.
For mouse events we’ll only focus on simple things, such as movement (X/Y coordinate of the mouse should be reported) and the left button click. With the presence of touch screens and laptops it’s hard to find a middle mouse button or a horizontal scrolling wheel, anyway.
For keyboard we will be interested in key presses and releases, as well as some modifier key status. At least we should handle Ctrl and Shift.
user input on Linux
On Linux we first need to adjust our window initialiser to support all the required event types:
XSelectInput(dpy, >w, ExposureMask | KeyPressMask | KeyReleaseMask | ButtonPressMask | ButtonReleaseMask | PointerMotionMask);
In the event loop we can handle them and extract information from the event structure:
switch (ev.type) {
case ButtonPress:
case ButtonRelease:
  mouse_btn = (ev.type == ButtonPress); /* is mouse pressed? */
  break;
case MotionNotify:
  mouse_x = ev.xmotion.x; /* read mouse X/Y */
  mouse_y = ev.xmotion.y;
  break;
case KeyPress:
case KeyRelease: {
  int k = XkbKeycodeToKeysym(dpy, ev.xkey.keycode, 0, 0);
  for (unsigned int i = 0; i < 124; i += 2) {
    /* Map XKB KeySym to our custom key code value */
    if (FENSTER_KEYCODES[i] == k) {
      keys[FENSTER_KEYCODES[i + 1]] = (ev.type == KeyPress);
      break;
    }
  }
  /* read keyboard modifiers */
  int m = ev.xkey.state;
  kbd_mod = (!!(m & ControlMask)) | (!!(m & ShiftMask) << 1) |
            (!!(m & Mod1Mask) << 2) | (!!(m & Mod4Mask) << 3);
} break;
This is where the ugly part starts. Mouse handling is simple. But for keyboard every platform has its own definitions of “key codes”. To remain cross-platform we would have to map platform-specific keycodes into some common layout.
Usually, there are several approaches how to pick that common layout. Some choose the “primary” platform and convert key codes from the others, some choose HID standard (which is really well defined and elegant). I decided to restrict key codes to a small minimal subset, and only use 7-bit ASCII for alphanumeric keys or symbols such as Enter, Backspace, Tab etc. I completely ignored CapsLock and other not-so-common keys. But at least we shall have a key code that can be just printed to see which key it belongs to. For arrows I made an exception and mapped codes 17..20 to them (DC1..DC4 in ASCII set).
I wasn’t sure if X11 keysym definitions are stable constants on all the systems that support X11, so I put them in an array where ASCII key code follows the X11 keysym, so that a simple for-loop could map one to the other:
static int FENSTER_KEYCODES[124] = {XK_BackSpace,8,XK_Delete,127,XK_Down,18,XK_End,5,XK_Escape,27,XK_Home,2,XK_Insert,26,XK_Left,20,XK_Page_Down,4,XK_Page_Up,3,XK_Return,10,XK_Right,19,XK_Tab,9,XK_Up,17,XK_apostrophe,39,XK_backslash,92,XK_bracketleft,91,XK_bracketright,93,XK_comma,44,XK_equal,61,XK_grave,96,XK_minus,45,XK_period,46,XK_semicolon,59,XK_slash,47,XK_space,32,XK_a,65,XK_b,66,XK_c,67,XK_d,68,XK_e,69,XK_f,70,XK_g,71,XK_h,72,XK_i,73,XK_j,74,XK_k,75,XK_l,76,XK_m,77,XK_n,78,XK_o,79,XK_p,80,XK_q,81,XK_r,82,XK_s,83,XK_t,84,XK_u,85,XK_v,86,XK_w,87,XK_x,88,XK_y,89,XK_z,90,XK_0,48,XK_1,49,XK_2,50,XK_3,51,XK_4,52,XK_5,53,XK_6,54,XK_7,55,XK_8,56,XK_9,57};
user input on macOS
MacOS comes with a bit less of a surprise for key codes, but is somewhat peculiar in terms of mouse handling – the Y coordinate is inverted. Like in maths, where X axis goes right and Y axis goes up. To keep things compatible with other platforms we have to subtract Y from the window height to get a proper “computer graphics” coordinate system (where Y does down and (0,0) is a top-left corner of the window).
No changes are required in the initialisation of an app, but the event loop should be changed to handle more event types:
static const uint8_t FENSTER_KEYCODES[128] = {65,83,68,70,72,71,90,88,67,86,0,66,81,87,69,82,89,84,49,50,51,52,54,53,61,57,55,45,56,48,93,79,85,91,73,80,10,76,74,39,75,59,92,44,47,78,77,46,9,32,96,8,0,27,0,0,0,0,0,0,0,0,0,0,0,0,0,0,0,0,0,0,0,0,0,0,0,0,0,0,0,0,0,0,0,0,0,0,0,0,0,0,0,0,0,0,0,0,0,0,0,0,0,0,0,0,0,0,0,0,0,0,0,0,26,2,3,127,0,5,0,4,0,20,19,18,17,0};
NSUInteger evtype = msg(NSUInteger, ev, "type");
switch (evtype) {
case 1: f->mouse |= 1; return 0;  /* NSEventTypeMouseDown */
case 2: f->mouse &= ~1; return 0; /* NSEventTypeMouseUp*/
case 5: case 6: { /* NSEventTypeMouseMoved */
  CGPoint xy = msg(CGPoint, ev, "locationInWindow");
  f->x = (int)xy.x;
  f->y = (int)(f->height - xy.y);
  return 0;
}
case 10: case 11: { /*NSEventTypeKeyDown, NSEventTypeKeyUp:*/
  NSUInteger k = msg(NSUInteger, ev, "keyCode");
  f->keys[k < 127 ? FENSTER_KEYCODES[k] : 0] = evtype == 10;
  NSUInteger mod = msg(NSUInteger, ev, "modifierFlags") >> 17;
  f->mod = (mod & 0xc) | ((mod & 1) << 1) | ((mod >> 1) & 1);
  return 0;
}
}
On macOS the key codes are known constants, so we can define a lookup-table to convert them to the ASCII symbols. We have to handle two separate move events – one for the left mouse button being pressed (“drag”) and another for a regular move with a mouse button released. The rest should be self-explanatory.
user input on windows
Finally, WinAPI comes with very convenient WM_ message types that we can handle in the most straightforward way inside our WndProc:
static const uint8_t FENSTER_KEYCODES[] = {0,27,49,50,51,52,53,54,55,56,57,48,45,61,8,9,81,87,69,82,84,89,85,73,79,80,91,93,10,0,65,83,68,70,71,72,74,75,76,59,39,96,0,92,90,88,67,86,66,78,77,44,46,47,0,0,0,32,0,0,0,0,0,0,0,0,0,0,0,0,0,0,0,0,0,0,0,0,0,0,0,0,0,0,0,0,0,0,0,0,0,0,0,0,0,0,0,0,0,0,0,0,0,0,0,0,0,0,0,0,0,0,0,0,0,0,0,0,0,0,0,0,0,0,0,0,0,0,0,0,0,0,0,0,0,0,0,0,0,0,0,0,0,0,0,0,0,0,0,0,0,0,0,0,0,0,0,0,0,0,0,0,0,0,0,0,0,0,0,0,0,0,0,0,0,0,0,0,0,0,0,0,0,0,0,0,0,0,0,0,0,0,0,0,0,0,0,0,0,0,0,0,0,0,0,0,0,0,0,0,0,0,0,0,0,0,0,0,0,0,0,0,0,0,0,0,0,0,0,0,0,0,0,0,0,0,0,0,0,0,0,0,0,0,0,0,0,0,0,0,0,0,0,0,0,0,0,0,0,0,0,0,0,0,0,0,0,0,0,0,0,0,0,0,0,0,0,0,0,0,0,0,0,0,0,0,0,0,0,0,0,0,0,0,0,0,0,0,0,0,0,0,0,0,0,0,0,0,0,0,0,0,0,0,0,0,0,0,0,0,0,0,0,0,0,0,0,2,17,3,0,20,0,19,0,5,18,4,26,127};
...
case WM_LBUTTONDOWN: case WM_LBUTTONUP: f->mouse = (msg == WM_LBUTTONDOWN); break;
case WM_MOUSEMOVE: f->y = HIWORD(lParam); f->x = LOWORD(lParam); break;
case WM_KEYDOWN: case WM_KEYUP: {
  f->mod = ((GetKeyState(VK_CONTROL) & 0x8000) >> 15) |
           ((GetKeyState(VK_SHIFT) & 0x8000) >> 14) |
           ((GetKeyState(VK_MENU) & 0x8000) >> 13) |
           (((GetKeyState(VK_LWIN) | GetKeyState(VK_RWIN)) & 0x8000) >> 12);
  f->keys[FENSTER_KEYCODES[HIWORD(lParam) & 0x1ff]] = !((lParam >> 31) & 1);
} break;
We’re done here. Inside the main event loop on all three platforms users can now check for x/y coordinates, mouse flag, a mod bitmask and keys status array.
Timers and FPS
Since different computers have different performance it’s a common practice to limit the rate at which the frames are refreshed. Usually, an FPS=60 (i.e. 60 frames per second, or 16.6ms per frame) is used. To restrict our event loop from rendering and polling things faster than that we would need two functions: one to return the current time (at least in milliseconds) and another to sleep for the given amount of time.
Since both macOS and Linux have some POSIX compatibility we can reuse the same code:
void fenster_sleep(int64_t ms) {
  struct timespec ts;
  ts.tv_sec = ms / 1000;
  ts.tv_nsec = (ms % 1000) * 1000000;
  nanosleep(&ts, NULL);
}
int64_t fenster_time() {
  struct timespec time;
  clock_gettime(CLOCK_REALTIME, &time);
  return time.tv_sec * 1000 + (time.tv_nsec / 1000000);
}
Windows, on the other hand, is special, but nevertheless very convenient:
void fenster_sleep(int64_t ms) { Sleep(ms); }
int64_t fenster_time() {
  LARGE_INTEGER freq, count;
  QueryPerformanceFrequency(&freq);
  QueryPerformanceCounter(&count);
  return (int64_t)(count.QuadPart * 1000.0 / freq.QuadPart);
}
A typical application structure for our library would look like this (you can use an up-to-date “fenster.h” from https://github.com/zserge/fenster):
#include "fenster.h"

int main() {
  uint32_t fb[320*240] = {0};
  struct fenster f = { .width = 320, .height = 240, .title = "hello", .buf = fb };
  fenster_open(&f);
  int64_t now = fenster_time();
  while (fenster_loop(&f) == 0) {
    /* handle f.keys, f.mod, f.x, f.y, f.mouse */
    /* update framebuffer "fb" */
    /* limit FPS to 60 frames per second */
    uint64_t ms = now + (1000/60) - fenster_time();
    if (ms > 0) fenster_sleep(ms);
    now = fenster_time();
  }
  fenster_close(&f);
}
So far so good. Clear, cross-platform app loop. But how can we actually draw anything?
Drawing primitives
Having a cross-platform framebuffer is convenient, but how we can turn it into a canvas?
Let’s start with drawing pixels. Since a framebuffer is essentially an array of pixels – we can introduce a macro to access an individual pixel:
#define fenster_pixel(f, x, y) ((f)->buf[((y) * (f)->width) + (x)])

struct fenster f = ...
fenster_pixel(&f, 25, 40) = 0xff0000; /* pixel at (25,40) is now red */
uint32_t rgb = fenster_pixel(&f, 10, 10);   /* get pixel colour at (10,10) */
Next simple task would be to fill the complete framebuffer with a solid colour:
memset(f->buf, rgb, f->width*f->height*sizeoof(uint32_t));
Drawing rectangles isn’t that complicated either:
void fenster_rect(struct fenster *f, int x, int y, int w, int h, uint32_t c) {
  for (int row = 0; row < h; row++)
    for (int col = 0; col < w; col++)
      fenster_pixel(f, x + col, y + row) = c;
}
To draw a circle we can use a simple algorithm that checks for every pixel within the square where the circle is inscribed. If a circle radius squared is less than the sum of dx/dy squared (basic school math) – the pixel belongs to the circle and should be painted:
void fenster_circle(struct fenster *f, int x, int y, int r, uint32_t c) {
  for (int dy = -r; dy <= r; dy++)
    for (int dx = -r; dx <= r; dx++)
      if (dx * dx + dy * dy <= r * r)
        fenster_pixel(f, x + dx, y + dy) = c;
}
To draw a line we can use Bresenham’s algorithm, a well-known classic:
void fenster_line(struct fenster *f, int x0, int y0, int x1, int y1, uint32_t c) {
  int dx = abs(x1 - x0), sx = x0 < x1 ? 1 : -1;
  int dy = abs(y1 - y0), sy = y0 < y1 ? 1 : -1;
  int err = (dx > dy ? dx : -dy) / 2, e2;
  for (;;) {
    fenster_pixel(f, x0, y0) = c;
    if (x0 == x1 && y0 == y1) break;
    e2 = err;
    if (e2 > -dx) { err -= dy; x0 += sx; }
    if (e2 < dy)  { err += dx; y0 += sy; }
  }
}
Having this we can now draw complex polygons and would probably need a “flood fill” algorithm. Typically it is implemented using a queue of pixels to check and paint, but we can use recursion, as long as the filled area remains small enough to not overflow the stack:
void fenster_fill(struct fenster *f, int x, int y, uint32_t old, uint32_t c) {
  if (x < 0 || y < 0 || x >= f->width || y >= f->height) return;
  if (fenster_pixel(f, x, y) == old) {
    fenster_pixel(f, x, y) = c;
    fenster_fill(f, x - 1, y, old, c);
    fenster_fill(f, x + 1, y, old, c);
    fenster_fill(f, x, y - 1, old, c);
    fenster_fill(f, x, y + 1, old, c);
  }
}
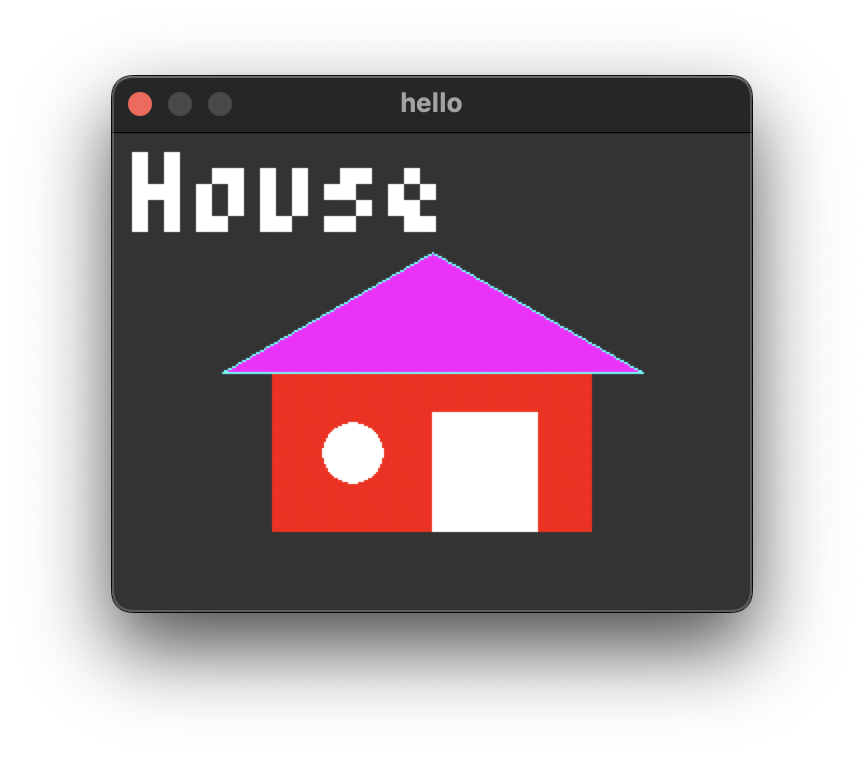
Last but not least, let’s try to print some text on screen! To go truly old-school we will be using a bitmap font. In other words, our font is an array where each element corresponds to an ASCII character and describes which pixels in a glyph grid to colourise to make it look like a letter.
I’ve picked the smallest possible readable bitmap font where each letter is 5 pixels tall and 3 pixels wide (even though I’ve previously tried to create much smaller fonts that are not so readable at all).
To encode the 5x3 font we can use one uint16_t per glyph. For example, here’s letters “A” and “B”:
  #    010  | # #    110   A=101 1111 0111 1010
# # #  111  | #   #  101    =0x5f7a
#   #  101  | # # #  111   B=011 1011 1110 1011
# # #  111  | #   #  101    =0x3beb
#   #  101  | # #    110
If we treat every glyph as a sequence of bits counting from the top left corner we get 010111101111101 for “A”. But bits in numbers are usually numbered right-to-left, so we should reverse it and get 101111101111010. Splitting this into octets and converting them to hexadecimal form would give us 0x5F7A. Now, how to draw such a glyph?
static uint16_t font5x3[] = {0,0,0,0,0,0,0,0,0,0,0,0,0,0,0,0,0,0,0,0,0,0,0,0,0,0,0,0,0,0,0,0,0,0x2092,0x2d,0x5f7d,0x279e,0x52a5,0x7ad6,0x12,0x4494,0x1491,0x17a,0x5d0,0x1400,0x1c0,0x400,0x12a4,0x2b6a,0x749a,0x752a,0x38a3,0x4f4a,0x38cf,0x3bce,0x12a7,0x3aae,0x49ae,0x410,0x1410,0x4454,0xe38,0x1511,0x10e3,0x73ee,0x5f7a,0x3beb,0x624e,0x3b6b,0x73cf,0x13cf,0x6b4e,0x5bed,0x7497,0x2b27,0x5add,0x7249,0x5b7d,0x5b6b,0x3b6e,0x12eb,0x4f6b,0x5aeb,0x388e,0x2497,0x6b6d,0x256d,0x5f6d,0x5aad,0x24ad,0x72a7,0x6496,0x4889,0x3493,0x2a,0xf000,0x11,0x6b98,0x3b79,0x7270,0x7b74,0x6750,0x95d6,0xb9ee,0x5b59,0x6410,0xb482,0x56e8,0x6492,0x5be8,0x5b58,0x3b70,0x976a,0xcd6a,0x1370,0x38f0,0x64ba,0x3b68,0x2568,0x5f68,0x54a8,0xb9ad,0x73b8,0x64d6,0x2492,0x3593,0x3e0};
static void fenster_text(struct fenster *f, int x, int y, char *s, int scale, uint32_t c) {
  while (*s) {
    int chr = *s++;
    for (int dy = 0; dy < 5; dy++)
      for (int dx = 0; dx < 3; dx++)
        if (font5x3[chr] >> (dy * 3 + dx) & 1)
          fenster_rect(f, x + dx * scale, y + dy * scale, scale, scale, c);
    x = x + 4 * scale;
  }
}
And we are finally ready to create some visual masterpieces:
Sound
We carry on. So far we’ve conquered main app loop, framebuffer/canvas and user input. But why do it all in silence? Can we add some audio playback?
Audio can be very complicated, and low-level audio even more so. But if we only focus on the most basic use cases – like, play a mono stream of floating-point audio samples – we can make it work rather easily on most of the computers.
It’s quite a safe bet to choose ALSA for Linux (since it’s part of the kernel), WinMM for WinAPI (as it’s been there for ages) and CoreAudio for macOS.
Many audio libraries choose a callback API model to give user more control over the latency and buffering. In our case, to keep the simplicity of the polling loop from the above let’s choose the synchronous “streaming” approach. We would need to implement 4 functions:
- One to open the default audio device.
- Another to close it.
- One to get the number of available samples to be written into the audio stream.
- Another to actually write them.
The implementation should guarantee that any attempt to write a buffer of samples not longer than the available number – it will not block. Then the caller should check the available count, take care of rendering/mixing sound and writing that part of the buffer.
ALSA implementation would be the simplest of them all:
int fenster_audio_open(struct fenster_audio *fa) {
  if (snd_pcm_open(&fa->pcm, "default", 0, 0)) return -1;
  int fmt = (*(unsigned char *)(&(uint16_t){1})) ? 14 : 15;
  return snd_pcm_set_params(fa->pcm, fmt, 3, 1, FENSTER_SAMPLE_RATE, 1, 100000);
}
int fenster_audio_available(struct fenster_audio *fa) {
  int n = snd_pcm_avail(fa->pcm);
  if (n < 0) snd_pcm_recover(fa->pcm, n, 0);
  return n;
}
void fenster_audio_write(struct fenster_audio *fa, float *buf, size_t n) {
  int r = snd_pcm_writei(fa->pcm, buf, n);
  if (r < 0) snd_pcm_recover(fa->pcm, r, 0);
}
void fenster_audio_close(struct fenster_audio *fa) { snd_pcm_close(fa->pcm); }
On macOS and WinAPI we would have to use double-buffering technique, where multiple audio buffer objects are created and chained for the playback, and as soon as the first one is done – the next one continues the playback, while the first one is being fulfilled with the following audio samples.
I wouldn’t post all of the code here, but you can check it out on Github.
Bindings
C is a nice small language, but for quick prototyping maybe some other, less archaic languages could fit better.
There are Go bindings using CGo and the library can be imported like a normal Go module. @dim13 has offerred a few adjustments to the API so that our framebuffer is available as a standard image.Image interface. This enables compatibility with many other libraries, such as https://github.com/fogleman/gg or https://github.com/llgcode/draw2d.
Other bindings that were trivial to write were in Zig. In fact, Zig so well integrates with C code that it can use Fenster library directly:
const std = @import("std");
const c = @cImport({
    @cInclude("fenster.h");
});

pub fn main() void {
    var buf: [320 * 240]u32 = undefined;
    var f = std.mem.zeroInit(c.fenster, .{.width = 320, .height = 240, .title = "hello", .buf = &buf[0]});
    _ = c.fenster_open(&f);
    defer c.fenster_close(&f);
    var t: u32 = 0;
    var now: i64 = c.fenster_time();
    while (c.fenster_loop(&f) == 0) {
        // Exit when Escape is pressed
        if (f.keys[27] != 0) {
            break;
        }
        // Render x^y^t pattern
        for (buf) |_, i| {
            buf[i] = @intCast(u32, i % 320) ^ @intCast(u32, i / 240) ^ t;
        }
        t +%= 1;
        // Keep ~60 FPS
        var diff: i64 = 1000 / 60 - (c.fenster_time() - now);
        if (diff > 0) {
            c.fenster_sleep(diff);
        }
        now = c.fenster_time();
    }
}
Of course, some Zig-friendly idiomatic wrappers are always welcome!
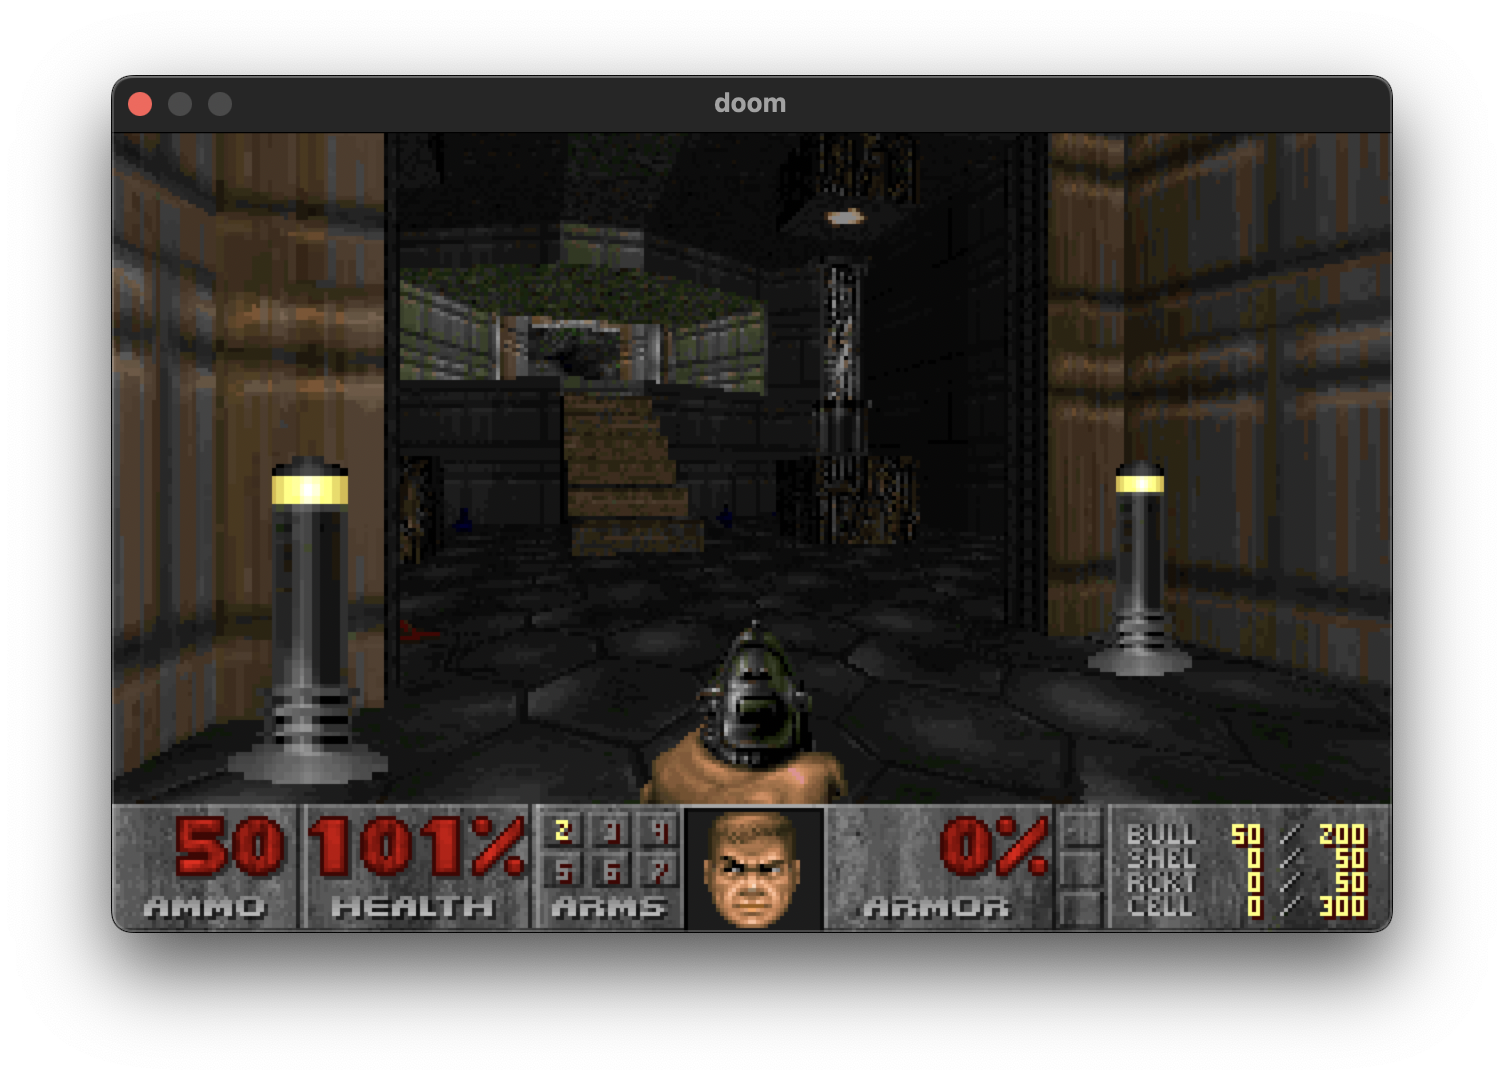
But can it run Doom?
Yes, it can! Porting Doom has never been easier these days, thanks to the wonderful https://github.com/ozkl/doomgeneric. All you have to do is to implement several functions: for opening a window, for updating the framebuffer, for handling time and for user input. We’re lucky – Fenster literally has an API call for each of these cases.
If you only override these functions you already get a familiar starting picture and some demo animation:
struct fenster f = { .width = DOOMGENERIC_RESX, .height = DOOMGENERIC_RESY, .title = "doom" };
void DG_Init() { f.buf = DG_ScreenBuffer; fenster_open(&f); }
void DG_DrawFrame() { fenster_loop(&f); }
void DG_SleepMs(uint32_t ms) { fenster_sleep(ms); }
uint32_t DG_GetTicksMs() { return fenster_time(); }
What’s left is user input. Doom uses key events instead of key statuses, and it peeks them one by one. So we should keep another array of last know key statuses, compare it to the current keys and return an event if there is a mismatch. Additionally, Doom has its own custom key mapping that might not match our key codes, so we need to do some conversion:
unsigned char toDoomKey(int k) {
  switch (k) {
  case '\n': return KEY_ENTER;
  case '\x1b': return KEY_ESCAPE;
  case '\x11': return KEY_UPARROW;
  case '\x12': return KEY_DOWNARROW;
  case '\x13': return KEY_RIGHTARROW;
  case '\x14': return KEY_LEFTARROW;
  case 'Z': return KEY_FIRE;
  case 'X': return KEY_RSHIFT;
  case ' ': return KEY_USE;
  }
  return tolower(k);
}

int DG_GetKey(int *pressed, unsigned char *doomKey) {
  static int old[128] = {0};
  for (int i = 0; i < 128; i++) {
    if ((f.keys[i] && !old[i]) || (!f.keys[i] && old[i])) {
      *pressed = old[i] = f.keys[i];
      *doomKey = toDoomKey(i);
      return 1;
    }
  }
  return 0;
}
Unbelievable, but in less than 50 lines of code we got a fully working Doom game running on top of a tiny cross platform graphics library we’ve just created!
Well, if it can run Doom – it can do anything! I hope this little toy library would be helpful to those who miss the simplicity of the old school graphics. Pull requests, bug fixes and contributions are appreciated, as long as they don’t bloat the library and keep it simple.
I hope you’ve enjoyed this article. You can follow – and contribute to – on Github, Mastodon, Twitter or subscribe via rss.
Jan 15, 2023
